
How to Propagate Monstera (Swiss Cheese Plant): Water, Soil, Air Layering and Division
Monstera is one of the most forgiving plants you can propagate. Even first-timers tend to get it right, and a healthy mother plant gives you plenty to work with. This guide covers all four methods from start to finish, including where exactly to cut, what to watch for, and how to fix the most common problems.
For light requirements, soil, watering, and general care, visit our Monstera Care Guide. If you've already had success with snake plant propagation, the process here is similar in some ways — but monstera has one non-negotiable you need to know upfront.
The One Thing You Have to Get Right: Nodes
Every propagation method for monstera depends on the node. No exceptions.
Nodes are the points along the stem where leaves, aerial roots, and new shoots grow out of. They look like a slight thickening or bump on the stem, usually right at the base of where a leaf petiole meets the vine. When a leaf drops or gets removed, the scar it leaves behind marks the spot. Aerial roots, the chunky brownish growths that extend away from the stem, often appear near nodes too and are a helpful visual cue.
A few things that will not root no matter how long you wait:
- A leaf by itself
- A stem with no node on it
- An aerial root that isn't attached to a stem with a node
What about a node cutting with no leaf? It will work, just slowly. Without a leaf driving photosynthesis the cutting has a harder time generating energy, so expect a longer wait before you see new growth. Totally doable, just not the fastest route.
What You'll Need
- Sharp, clean pruning shears — a pair like the Fiskars Micro-Tip Pruning Snips makes clean cuts without crushing the stem. Sterilize with rubbing alcohol before use.
- A healthy monstera with at least one stem you can cut
- Clear glass jar or vase (for water method)
- Small pot with drainage holes
- Well-draining potting mix — standard indoor potting soil mixed with perlite works well
- Sphagnum moss and plastic wrap (for air layering) — Besgrow Spagmoss is a reliable option
- Rooting hormone is optional but speeds things up
Best Time to Propagate
Spring through early summer is ideal. Monstera is actively pushing out new growth then, which means cuttings root faster too. Fall and winter propagations work fine but take noticeably longer, sometimes twice as long. If you're going for it in winter, a few hours of supplemental lighting in the morning can help compensate for short days.
How to Take a Good Cutting
This part applies regardless of which method you choose:
- Find a healthy stem with at least one node. Two or three leaves on the cutting is better than one — more leaves means more photosynthesis driving root growth.
- Cut 1 to 2 inches below the node using clean, sharp shears. You want the node on the cutting, not left on the parent plant.
- If any leaves would end up underwater or buried in soil, remove them now to prevent rot.
- If there's an aerial root present at the node, keep it. It's not required but it gives the cutting a head start.
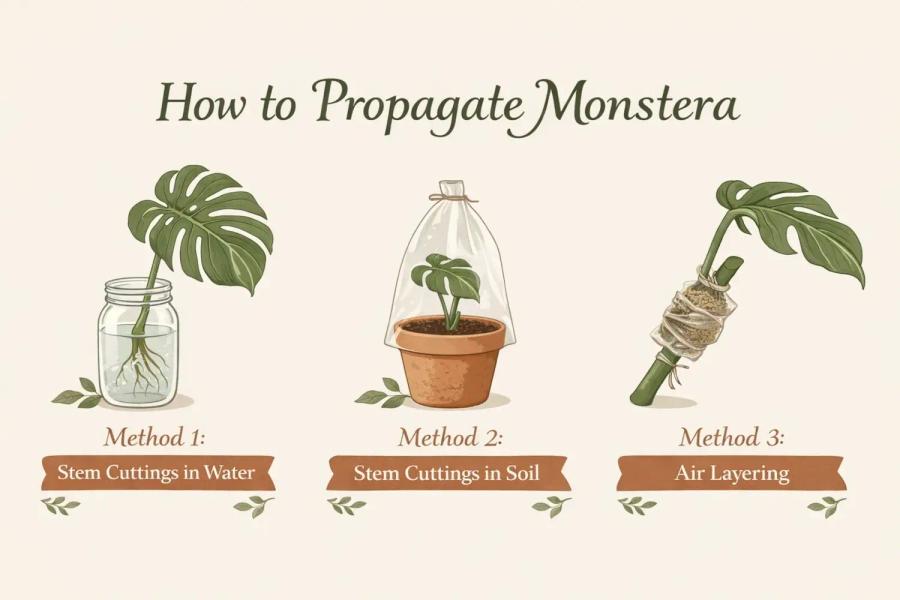
Method 1: Water Propagation
The most popular method for a reason. You get to watch the roots grow, there's very little to mess up, and the setup takes about two minutes.
- Prep your cutting as above. Remove any leaves that would sit below the waterline.
- Place the cutting in a clear glass or jar. The node needs to be submerged, but keep the leaves above water — submerged leaves rot.
- Set it somewhere with bright indirect light. Direct sun causes algae and can scorch the cutting.
- Change the water every 7 to 10 days, or sooner if it goes cloudy.
- Roots usually start appearing within 2 to 4 weeks, though in winter it can take up to 8.
- Wait until roots are 2 to 3 inches long before moving to soil. Transferring too early puts the plant at risk, but waiting too long creates water roots that struggle to adapt to soil.
Can monstera live in water permanently? Yes. With clean water and a bit of liquid fertilizer during the growing season, they'll survive indefinitely this way. Growth will be slower and the plant won't get as big as it would in soil, but plenty of people keep them this way long-term.
Method 2: Soil Propagation
Soil propagation skips the water-to-soil transition, which means less shock for the cutting and generally stronger roots from the start. The tradeoff is you can't see what's happening, so you have to be patient.
- Take your cutting and optionally dip the cut end and node into rooting hormone powder before planting.
- Fill a small pot with well-draining mix. Perlite mixed into standard potting soil works well. The pot must have drainage holes.
- Make a hole in the center and plant the cutting so the node sits just below the soil surface.
- Water thoroughly, then back off and let the top inch dry out before watering again. Overwatering here is the number one reason cuttings fail.
- Place in bright indirect light.
- Roots typically form within 4 to 6 weeks. To check without uprooting the cutting, give it a very gentle upward tug. If you feel resistance, roots have anchored in.
Covering the cutting loosely with a clear plastic bag creates a little humidity tent that speeds things up. Just open it for an hour every couple of days so moisture doesn't build up and invite mold.
Method 3: Air Layering
Air layering is slower and more involved than the other methods, but it has the highest success rate because the cutting stays attached to the parent plant and keeps receiving nutrients the whole time roots form. Good choice for a stem you really don't want to lose, or for a very large plant where taking a cutting risks shock.
- Pick a healthy stem with a node and, if possible, an aerial root already present.
- Make a small wound or notch just below the node with clean shears. This tells the plant to send energy toward root production at that spot.
- Dampen a fistful of sphagnum moss until it's moist but not dripping. The Besgrow Spagmoss mentioned above works great here — it holds moisture well without getting waterlogged.
- Wrap the moss around the node, the wound, and any aerial root.
- Wrap the whole moss bundle in clear plastic wrap and secure with twist ties.
- Check moisture every few days by peeking through the plastic. Mist to remoisten if it's drying out.
- In 4 to 8 weeks, roots will start growing into the moss. Once you can see them through the plastic and they're an inch or two long, cut the stem below the rooted section.
- Plant the whole thing directly into potting mix — leave the moss on, no need to remove it.
Method 4: Division
Division isn't really propagation in the traditional sense, but it's the fastest way to get new monstera plants if your pot already has multiple plants growing together — which is very common with nursery-bought monsteras. Big box stores and nurseries often pot several plants together to make them look fuller.
- Take the whole root ball out of the pot.
- Gently work the roots apart with your hands. You're not trying to cut, just separate the individual root systems from each other.
- Pot each plant separately in fresh well-draining mix.
- Water thoroughly and keep out of direct sun for a week or so while they settle.
If the roots are really tangled you can use clean shears to separate them, but try to minimize cutting as much as possible.
Transplanting from Water to Soil
- Choose a pot with drainage holes — at least 4 to 5 inches wide.
- Put a layer of potting mix in the bottom.
- Set the rooted cutting in the center, spreading the roots out gently. Don't jam or fold them.
- Fill in around the roots, but don't pack the soil down tight — you want it loose enough for the roots to push through.
- Water well, then keep the soil evenly moist for the first couple of weeks while the water roots adapt.
As your new plant grows, it will want something to climb. Monstera is a natural vining climber, and giving it a moss pole like this one from Mossify lets it put out bigger, more fenestrated leaves over time. Plain stakes work for support but moss poles are genuinely better — the aerial roots can anchor into them the way they would to a tree in the wild.
Troubleshooting
No roots after several weeks. First, confirm the node is actually making contact with water or sitting at the right depth in soil. Second, check your light — low light is a very common reason cuttings stall. Move to a brighter spot.
Yellow or mushy stem. This is rot. In water, change it more frequently and make sure the cutting isn't crammed against the glass. In soil, let things dry out more and double-check your pot has drainage.
Roots are there but no new leaves. This is normal. Even healthy cuttings can take 2 to 3 months to push out their first new leaf after transplanting. Warm temps (65 to 85°F), some humidity, and consistent indirect light all help nudge it along.
Cutting is wilting. A little droop right after cutting is normal as the plant adjusts. If it persists more than a few days, get it out of any direct light and make sure the node is in contact with water or moist soil.
Black roots in the water jar. Usually a sign of low oxygen or bacteria. Change the water, clean the jar, and give it a fresh start. If the stem itself has gone soft and dark, that section has rotted and needs to be cut off above the rot to give the cutting a chance.
Frequently Asked Questions
Roots show up in 2 to 4 weeks with water propagation, 4 to 6 weeks in soil. After transplanting, expect 2 to 3 months before you see a new leaf.
No. A leaf with no node attached to a piece of stem will not produce roots, no matter how long you wait.
No — monstera roots reliably without it. It can shorten the wait and improve root density, but it's optional.
Water. It's the most forgiving, you can see what's happening, and the failure rate is low as long as your cutting has a node.
Yes, though expect slower rooting. A few hours of supplemental light in the morning or afternoon helps a lot if your days are short.
Almost always one of three things: no node on the cutting, not enough light, or the cutting is rotting from too much moisture. Check each one in that order.
Monstera is one of the most forgiving plants you can propagate. Even first-timers tend to get it right, and a healthy mother plant gives you plenty to work with. This guide covers all four methods from start to finish, including where exactly to cut, what to watch for, and how to fix the most common problems.
New to monstera altogether? Start with our Monstera Care Guide first — it covers light, watering, soil, and everything else you need to keep the mother plant healthy before you start taking cuttings.